GitHub Collaboration Workflows
Welcome & Setup Check (10 mins)
Learning Objective: Practice key steps for remote code hosting and collaborating in GitHub by using branches, opening pull requests (PRs), reviewing PRs, and merging changes
Activity: Make your own copy of a repo (clone)
We are going to use the repository https://github.com/dawnbcgov/aq-intro-to-github-shinyapps that hosts this website for practice today.
Go ahead and make a copy of the repository with all the files for (or using git terminology “clone”) this website to your local machine.
- Find the URL or address of the repository you want to make a local copy of on GitHub (in this case
https://github.com/dawnbcgov/aq-intro-to-github-shinyapps.git(how you clone via GitHub desktop) orgit@github.com:dawnbcgov/aq-intro-to-github-shinyapps.git(which is how to clone via cli)) - If you are using GitHub Desktop, go to File > Clone repository
- Or, if you are using the
gitcli, use Git Bash and the commandgit clonewhere the
Refresher on key concepts with version control (10 mins)
- Key concepts we want to review:
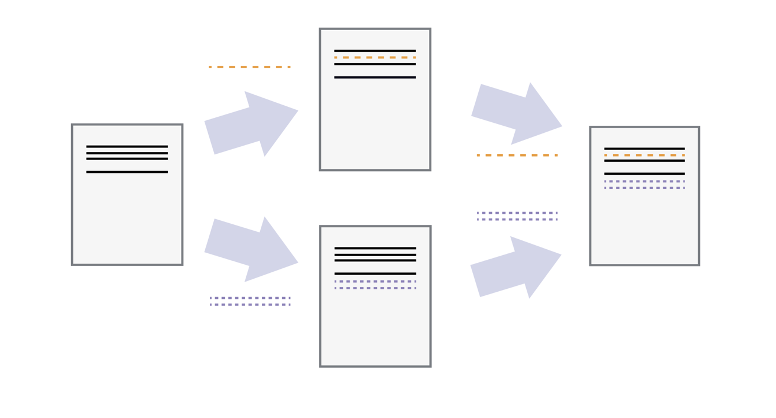
Version Control
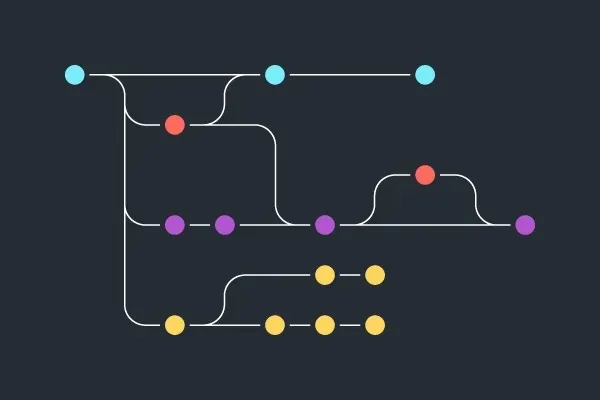
Sequential changes:
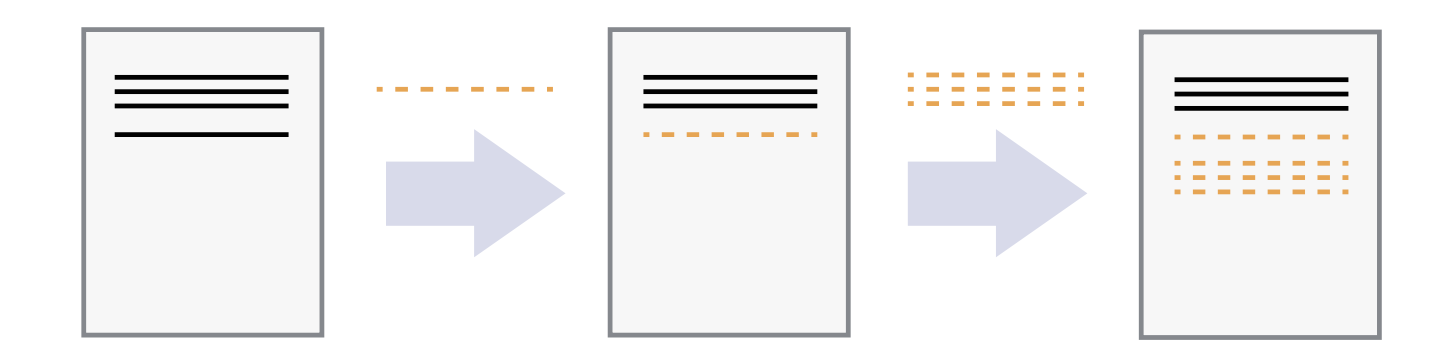
The power of git and similar version control systems: different versions can be saved, conflicts resolved, and then merged together:
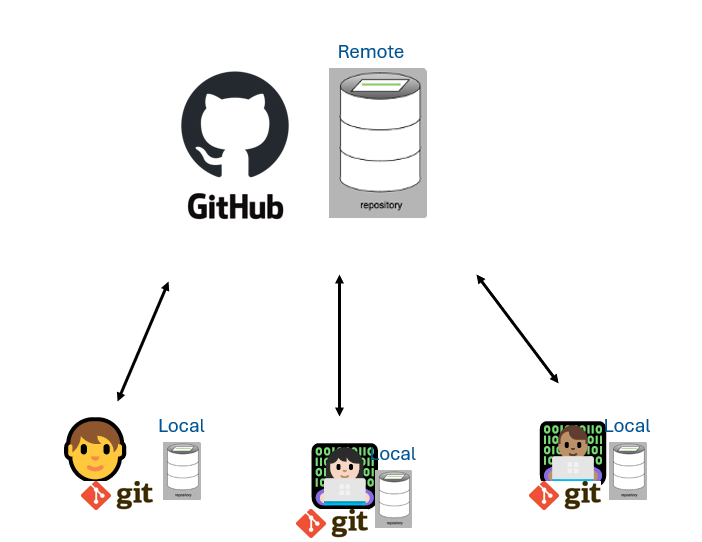
Remote Code Hosting and GitHub
Branches
Tracking changes (20 mins)
Activity: Make a change to this site (commit and push)
Now that we each have a copy of this site, we are going to make a change! (First a micro crash course on quarto and markdown)
So, now, on your computer, make a new page for this website in the practice area. Add whatever you want then save it. Next, you’ll need to commit that change and push (or publish / send it) so we all can see.
- Open RStudio, VS Code or your preferred editor, markdown files are like text files so you could use notepad if you want
- Create a new file in the
practicefolder, it should end in.qmdand needs to have the---section at the top. (You could make a copy of one of the files that are there) - Make your edits and save
- When you are ready, select the file you changed, commit it (you will need to add a message), and push it
- Software Carpentry: Version Control with Git (Episode: 4. Tracking changes)
Collaboration on GitHub (20 mins)
We’ve all been working from the main branch, but that can be risky for a many reasons.
Just a couple: we might make a mistake while we’re working and if we just keep updating the authoritative copy we could miss it. second, two people might change the same file and then we need a process to resolve that conflict.
Git and GitHub give us powerful collaboration tools we can use to manage all these processes!
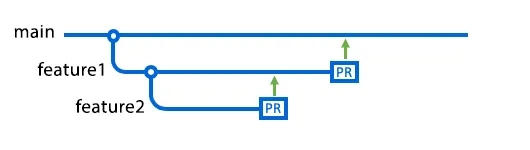
Creating pull requests (PR)
Activity: Make a change to another page on a branch and change it back to the main site (pull request)
Let’s make an edit to someone else’s page on a new branch and use the collaboration tools to review and merge those changes (and resolve conflicts!).
- First you have to make a new
branchgive it a name that someone else is not likely to use, like your name - Open and edit an existing file in the
practicefolder - Make your edits and save
- When you are ready, select the file you changed, commit it (you will need to add a message), and push it. There will be an extra step to set up the branch in the repository we are all using depending on your software
- Then go to GitHub.com and go to the pull request tab
- Select your branch to "compare" with the main branch and then the button create pull request
Reviewing pull requests
To mitigate the risk of pushing directly to the main branch, some repositories have branch protection rules. These rules restrict merges and commits to specific branches unless specific criteria are made. One common criteria is that the pull request can only be merged to the main branch if it has been reviewed by another collaborator. Even without these rules, working on a development branch and asking a collaborator to review your pull request is good practice. When you create a pull request, you can use the GitHub pull request page to request/assign reviewers (right hand menu).
Activity: Review a proposed change to the main site (pull request)
Although this repo will not have branch protection rules applied, we can practice navigating the pull request review process on GitHub. Let’s review the practice branch we’ve created, pr_practice, together. Follow the instructions on the pull request itself. You can also walk through every step in the accordion box below.
- First, navigate to the pull request tab of the GitHub repository.
- Click on the PR you want to review. For this activity, it is the one named "PR Review Practice". Note that Issues and PRs are numbered in the same sequence.
- On the PR's page, you can first start with the "Conversation" tab and read through the PR author's description of the changes. You can follow any conversation that might have already happened and also see a history of commits, all in chronological order. Read through the existing comments and add a hello of your own.
- On the "Commits" tab, you can see just the commit history for the branch that is the subject of the pull request. Note that as the review and conversation progresses, further pushes to this branch will also update the pull request. That is, the pull request is for a *branch* to be pulled into another, not a specific commit.
- We can skip the "Checks" tab for this practice. For repos with Continuous Integration/Continuous Deployment (aka CI/CD), the history of the output of all automated checking and unit testing scripts will appear here. For workflows that use it, it can help the collaborators answer the question "Does this code work?"
- The "Files changed" tab is where you will do most of the reviewing. For each file changed, you can see the "diff" of the original and proposed changes. For long files, only the changed lines are displayed, but you can expand the collapsed lines if you need to see the context. Here are some review activities to try:
- Notice that there is a review interface in the upper right (that will stay on top as you scroll) showing how many files you have reviewed and a green button to finalise your review. But first, let's just read through the file with the long word list.
- Find duplicate lines and add a line-specific comment to flag as a duplicate. Just do one duplicate so others can flag too. You can do this by mousing over the space between the line number and the line of code. A blue + sign will appear. Click on it. You can type a comment (e.g. a correction of the spelling) and then add your comment with either "add single comment" or "Start a review" (choose this for this activity).
- You can also add a comment to the entire file rather than a specific line. In the upper right area of the box for the cat facts file (or any file in the PR), there is a speech bubble icon to click on and add a comment. Write a comment and then "Add review comment".
- When you are finished with each file, you can click the "Viewed" box to indicate that you have reviewed the file. It will close/collapse the container and you can move on to the next file. It's not necessary to check this box but it can help you keep track and indicate to others that you reviewed it without having to leave a comment that just says "looks good".
- Repeat with any other files and then click "Finish your review". You can write one additional "final review" comment if you want. You also have three options with your review: just comment, approve, or indicate that more changes are needed before you can approve. Submit an "approve" review.
The GitHub review interface is very handy. All review comments go into the “Conversation” tab. When specific lines of codes are mentioned, a preview appears. Each comment can have its own thread to help discuss the details of the code. Conversations can be “resolved” when you have iterated enough to meet the requirements.
If you come back to the PR after having reviewed it and changes have been made, the interface remembers what you have seen and you can just review the new changes. Files that you have clicked as “Viewed” will be unclicked if there were changes. If you need to see the full context and history, those are available as well, in the tabs mentioned above. You can also use diff tools on GitHub or on your own software to make more comparisons.
Finally, testing the code is not part of this activity, but if you wanted to run the code on the pull request locally, you would check out the branch of the PR and then you have a copy of the code being reviewed as well.
- Software Carpentry: Version Control with Git (Episode: 8. Collaborating and Episode 9. Conflicts)